The machine automates the cutting, not the judgment around it. This walkthrough covers the judgment: choosing and preparing stock the machine can trust, setting up support so slender work runs quiet, programming from a drawn outline, reading the 1st cut, and diagnosing the handful of symptoms that account for nearly every bad part a wood lathe produces.

Before the Machine: Choosing and Preparing the Blank
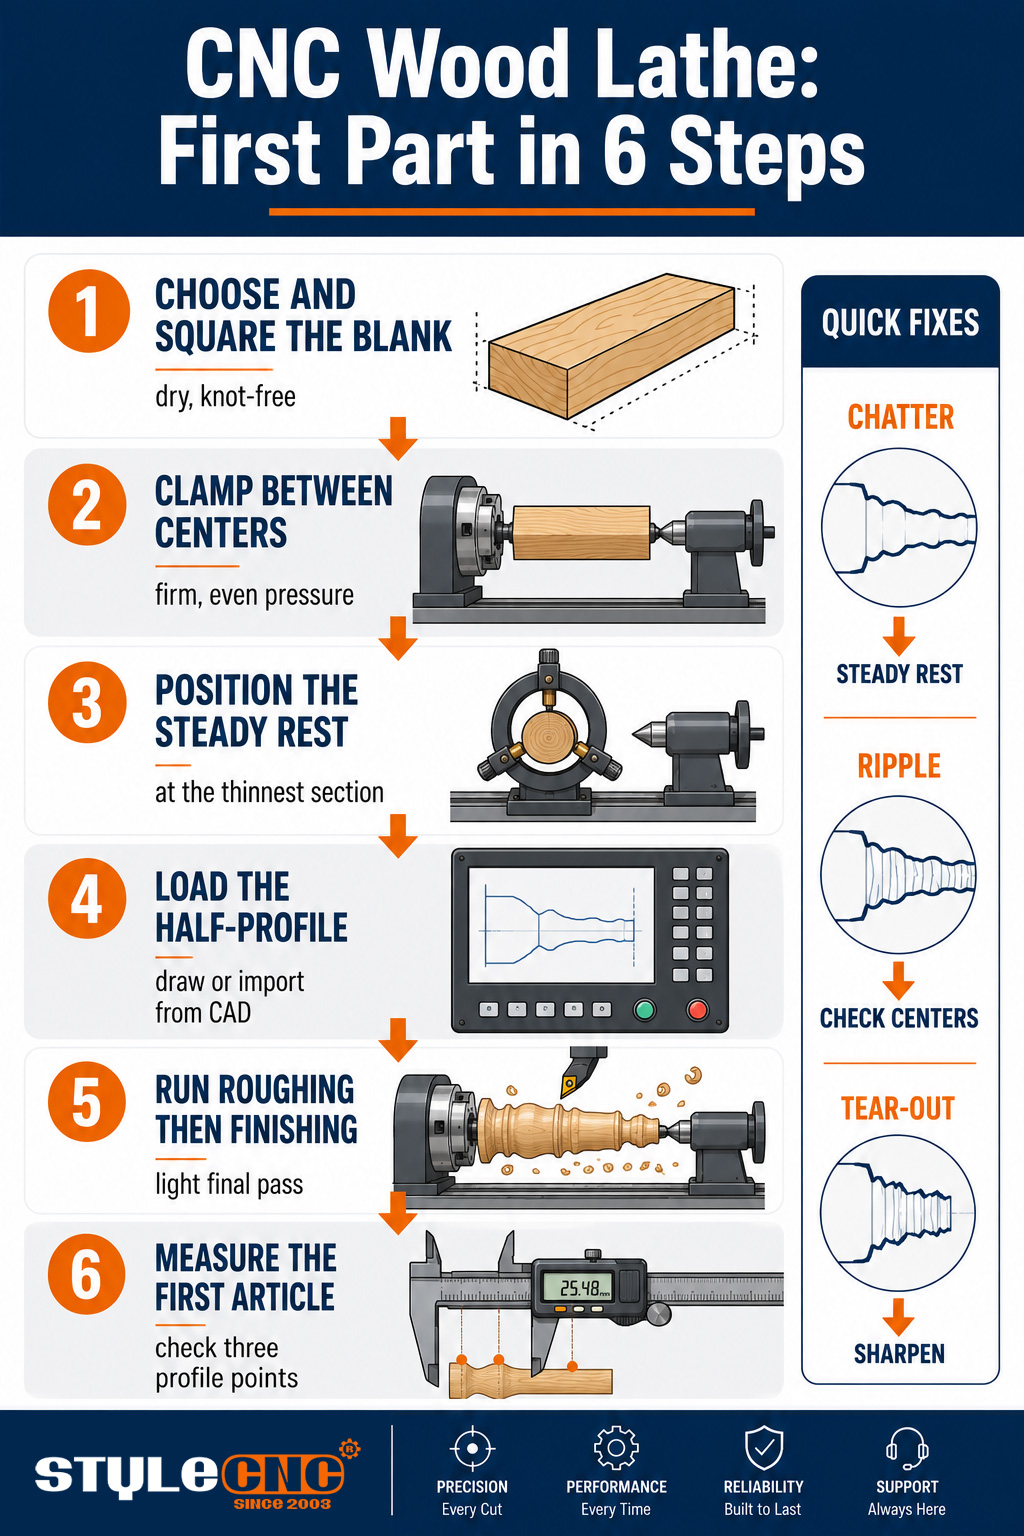
Every finished profile inherits the blank it started from, so preparation is the highest-leverage ten minutes in the whole process. Choose straight-grained stock without loose knots along the turning length, since a knot at a slender section can eject at speed. Dry, stable wood holds its dimensions after the cut; stock still moving with moisture turns round today and oval next week.
Cut blanks square and consistent, a touch longer than the finished part for the clamping stubs at each end. Mark and pre-drill centers when your chuck style benefits from it, because a blank loaded off-center forces the roughing pass to remove material unevenly and leaves the machine fighting vibration from the 1st second. The hardwoods that dominate production wood machining applications, beech, maple, birch, and oak, all reward this discipline with clean shearing cuts.
Setup: Clamping, Centers, and the Steady Rest
Load the blank between the drive chuck at the headstock and the live center at the tailstock, and seat both with firm, even pressure. Too loose and the blank slips under the roughing load; overtightened and long stock bows, which the profile pass faithfully reproduces as a curve you did not draw.
The steady rest is the difference between a machine that can turn slender work and 一つ that only lists it in the brochure. Position the rest fingers at the thinnest programmed section before the cycle starts, because a baluster or bat handle that measures under a few centimeters will flex away from the blade without support, and the result is chatter no parameter change can cure. Operators ask the same question in a dozen phrasings: why is the middle of my spindle rough when both ends are clean? The answer is deflection, and the rest is the fix.
Close the guards before every spin-up and stand clear of the rotation plane on a fresh blank's 1st revolution, since that is the moment an unseen check or loose knot lets go. The habit costs 2 seconds; the alternative teaches the lesson at spindle speed. Dust extraction running from the 1st cut is part of the same discipline, keeping shavings off the rails and fine dust out of the air the operator breathes all shift.
Programming the Profile
The program starts as a half-profile: a 2D outline of 一つ side of the finished part from end to end. Draw it in the controller's software or import it from CAD, set the blank diameter and length, and the software generates the roughing and finishing passes itself. There is no template to cut and no G-code to hand-write on a modern machine.
2 program settings deserve attention on every new part. Set the roughing depth so the square blank comes round in comfortable bites rather than 一つ heroic pass, and set the finishing feed slower than feels necessary for the 1st article. The full drawing-to-part workflow, with software screenshots and worked examples, is covered step by step in the how to use a wood lathe fundamentals guide, which pairs well with this page for first-week operators.
The 1st Cut: Parameters and Reading the Result
Start conservative and let the cut tell you where the margin is:
• 主軸速度: begin in the low thousands of RPM for common leg diameters, lower for large diameters, and increase only while the cut stays smooth.
• 荒加工: moderate feed, shallow bites; the goal is round stock, not a finished surface.
• フィニッシング: 一つ light continuous pass at reduced feed produces the surface; 2 hesitant passes produce witness lines.
• Listen and Look: a clean shearing cut sounds even and throws ribbons; hammering sounds and dust mean the edge or the feed is wrong.
Run the 1st article, stop, and measure it against the drawing at 3 points along the profile before committing the batch. The machine will happily repeat an error forty times with perfect consistency, so the 1st part carries all the inspection value. Finished examples across legs, balusters, and bats in the CNC木工旋盤プロジェクトギャラリー show what a dialed-in 1st article should look like surface-wise before sanding.
Troubleshooting: Symptom to Cause to Fix
Nearly every bad part a wood lathe makes traces to 一つ of 5 symptoms:
| 症状 | 考えられる原因 | 修正する | サイズ測定 |
|---|---|---|---|
| Chatter marks on thin sections | Unsupported stock flexing away from the blade | Add or reposition the steady rest at the slender zone; reduce depth of cut | Deflection visible at the rest point during the pass |
| Ripple along the whole profile | Worn centers, loose gibs, or blade past its edge | Re-seat centers, snug the gibs, rotate or replace the blade | Ripple pitch repeating with spindle rotation |
| Tear-out on figured grain | Feed too aggressive for the wood, dull edge | Slow the finishing feed, take a lighter final pass, sharpen | Surface reads smooth under a fingertip after the pass |
| Burn marks at profile valleys | Blade dwelling, speed too high for the diameter | Increase feed through the valley, drop spindle speed | Scorch appearing at the same profile points each part |
| Parts vary across the batch | Blanks inconsistent, clamping pressure drifting | Standardize blank prep, check chuck and tailstock force | Diameter spread across ten consecutive parts |
Work the table top to bottom when a symptom appears, and change 一つ variable at a time so the fix identifies itself. Deeper diagnostic trees, including electrical and controller faults beyond cutting problems, live in the 木工旋盤のトラブルシューティングガイド, which is the page to bookmark beside the machine.
The Maintenance Rhythm That Keeps It Cutting
• 毎シフト: clear shavings from the rails and screws, and check blade edges before the 1st cycle.
• 毎週: lubricate the guideways and ball screws to the manual's schedule, and verify tailstock alignment.
• 月額: inspect belt tension, check gib adjustment, and confirm the centers run true.
• As Worn: rotate or sharpen profile blades at the 1st sign of tear-out rather than after it ruins stock.
Pre-Flight Checklist Before Every Batch
✓ Blank stock straight, dry, knot-checked, and cut to consistent length.
✓ Chuck and tailstock seated firm and even, steady rest positioned at the thinnest section.
✓ Profile loaded, blank dimensions set, roughing depth and finishing feed reviewed.
✓ Blades inspected, guards closed, extraction running.
✓ 1st article measured at 3 profile points before the batch runs.
よくある質問
What spindle speed should I start with?
Start low for the diameter, in the low thousands of RPM for typical leg stock and slower for large diameters, then raise it while the cut stays smooth and quiet. The right speed announces itself; the wrong 一つ chatters or burns first.
Why does my part chatter only at the thin middle section?
Slender stock flexes away from the blade exactly where it is thinnest, and the bounce prints as chatter. Position the steady rest at that section and lighten the finishing cut; no speed or feed change substitutes for support.
Do I need to round blanks before loading, or can the machine take square stock?
Production machines take square stock directly; the roughing pass brings it round in seconds. What matters is that the square blank is straight and centered, since an off-center blank pounds the blade on every rotation until it comes round.
How do I stop tear-out on figured or curly wood?
Sharpen first, then slow the finishing feed and take a lighter final pass. Figured grain changes direction constantly, and only a keen edge at a gentle feed shears it cleanly; some highly figured stock simply needs a sanding allowance programmed in.
How often do the profile blades need sharpening or replacement?
By condition, not calendar: the 1st tear-out or fuzzy surface on stock that previously cut clean is the signal. Shops running dense hardwood daily touch up edges on a weekly rhythm and keep a sharpened spare set to swap without stopping production.
My finished profiles show a fine spiral ripple. What causes it?
A regular spiral pattern tracks with rotation and points at the mechanics: worn or loose centers, gib play, or a blade past its edge. Re-seat the centers, snug the gibs, and change the blade before touching the program.
Can I turn green or partially dried wood?
The machine will cut it, but the part will not stay the shape you cut. Green stock moves as it dries, so production turning wants dry, stable blanks; green turning belongs to craft bowls with intentional drying allowance, not batch spindle work.
What routine maintenance actually matters most?
Chips off the rails and screws every shift, lubrication on schedule, and honest blade condition. Those 3 habits prevent the wear chain that ends in ripple, chatter, and lost accuracy; everything else in the manual matters, but those 3 pay daily.
Run These Steps on the Right Machine
Every technique above assumes a machine with solid support, true centers, and a controller that speaks profiles. Compare configurations across the range of 旋削・彫刻用CNC木工旋盤 and get a free quote with training included.